Well, it’s been over four years since I paid attention to this Weekly Creations site/project. I’ve definitely continued to create all the while but didn’t find the time to document things, unfortunately. I think in the coming weeks I’ll write a couple posts to sum up some of the things myself and others around here have been creating, including building the studio in 2014, all the music projects we’ve done in there since, and all the developments with Inity Acoustics, like our shop and latest products.
After those posts, I’d like to regularly write here again. There are so many creative projects and people around here these days worthy of sharing.
Entryway Smart Mirror
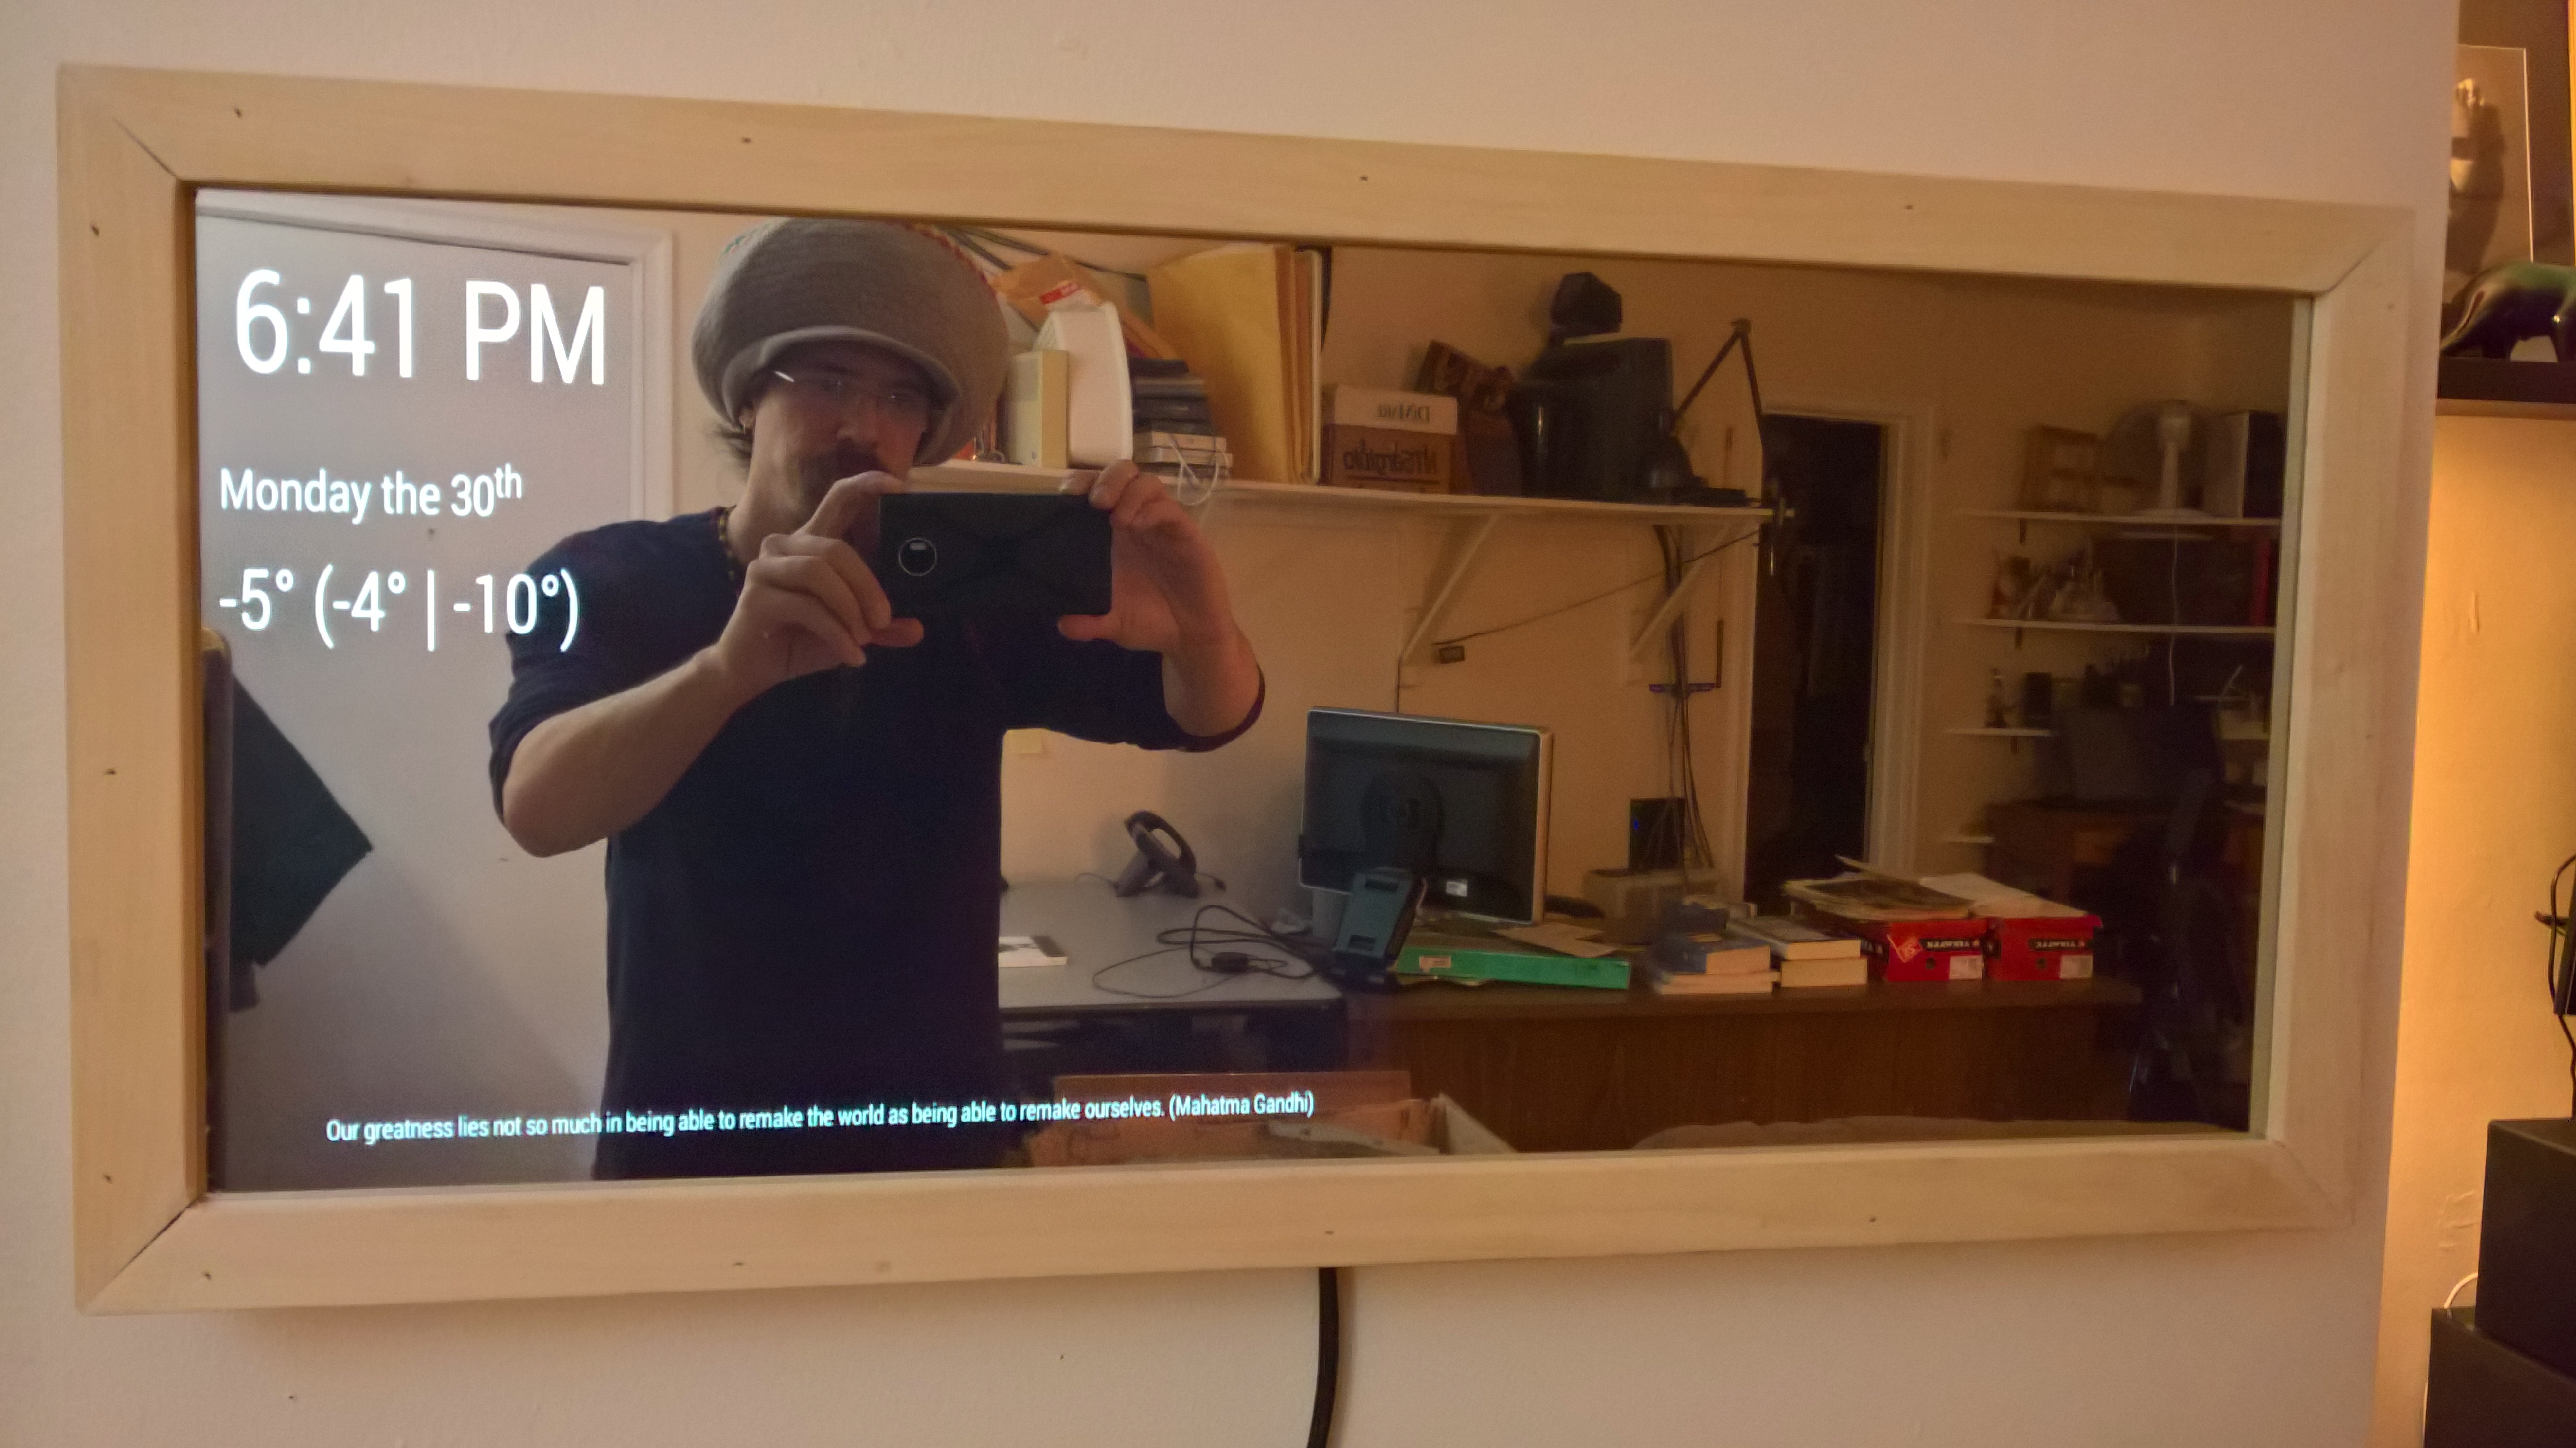
In the meantime, here is the most recent project I’ve had some fun with. I just finished this smart mirror today and put it up near my front door. It displays the time, date, weather, custom info from the web (currently configured to random quotes), as well as a bunch of other options.
It’s powered by an old smashed up Samsung Note 2. The phone’s display was completely smashed, but everything else worked fine. I plugged that into an old monitor I had ripped apart for some experiments years ago. The mirror part is glass from a display unit my neighbor was throwing out, with two-way mirror window film I picked up at the Home Depot. Then I built a quick frame for it with some extra lumber from the shop.
I plan to make another (or two) using different computers, software, and materials, and a bunch of cooler features. Maybe I’ll write a tutorial comparing different designs after I find which outcome I like best. If you’d find that useful, let me know!
This week I’m going to show you how to make the sound absorption acoustical panels I made for the studio a few months ago and wrote about in this post, which elaborates on the use and effectiveness of such panels.
I now have a small side business making these panels for others, using industry standard materials that look and perform beautifully. But today I’m going to give a tutorial on how to use less expensive materials in a way that will allow you to make some panels for yourself that still look great and are just as effective for controlling sound as the pro panels, at roughly half the price.
Now of course, professional panels are constructed well, are easy to install, and always come out looking top-notch because they’re made by people who with experience and with materials and processes that are paid for in bulk. But in all reality, they are fairly simple to build. So if you’re a little handy, have extra time and want to save a couple bucks, here’s how you do it!
And if you’d prefer, you can easily purchase professionally made panels at a guaranteed low price from the Inity Acoustics website.
Tools and Materials
First, let’s look at the necessary tools and materials. The tools you’ll need are fairly standard. Of course, if you have better tools you can save yourself a lot of time with some steps. But I’ll show you how to make these using tools many people already have at their disposal.
Tools:
Miter or Circular Saw (or you can likely have your wood cut where you purchase it)
I’m going to list the materials needed to make 8 panels. I picked 8 because the sound absorption insulation I’m recommending comes in packages of 8. Here’s what you need.
Sound absorption core material. Recommended: Roxul Safe’n’Sound (3″ thick, 2’x4′ for wood studs, 24″ on center) – 1 package of 8 (Other options listed below. Compare noise reduction coefficients of various materials here.)
1/4″ sheets of plywood (4’x8′) – 2 sheets – get these cut to 2’x4′ pieces at the store (or have them cut 1/16″ less than 2′ width to compensate for saw blade thickness)
If you have a nailer, replace the screws and finishing nails with 1 package of brad nails (1″)
Hanging Hardware – Options include D Rings with Picture Hooks, Z-clips, or other picture hangers.
Sound Absorption Core Material
There are other options you can use for this. There’s a material known as Owens Corning 703, that has a history of use in many studios around the world. It is the name brand for this kind of thing. Over the years, many companies have developed similar products, and pricing has become far more competitive. The acoustical properties for the Roxul material is nearly identical to Owens Corning products, but at a low fraction of the cost. If Roxul Safe & Sound is not available at your local building supplies outlet, there are a few other options. Here’s a list of some materials, and their approximate pricing:
Roxul Safe’n’Sound – 3″ thick – $0.69/sqft
Roxul RHT 80 – 2″ thick – $1.24/sqft (may be able to find it for less)
Owens Corning 703 – 2″ thick – $2.13/sqft (difficult to find in Canada)
Here’s a great site for comparing the sound absorption coefficients (the amount of sound absorbed at particular frequencies). You can see that these products have roughly the same effectiveness in absorbing sound over multiple frequencies. The Roxul Safe’n’Sound is definitely the best bang for your buck, and you can find it any Home Depot. Can’t go wrong! If you can’t get it as easily where you are located, you should be able to find one of the other options listed above.
Fabric
The higher end industry standard for this is Guilford and Maine acoustical fabrics. However, there are multiple potential fabrics to use for this application – but you can’t use just anything. It doesn’t need to be acoustically transparent, but it’s important to find a fabric that isn’t acoustically reflective. Absorptive fabrics (like felts) are okay.
The easiest (and generally least expensive) to use is burlap or jute, which both tend to have large enough holes between the threads to let the sound in, but not too large as to allow the fibers of the core material out. You can also use various cotton or polyester fabrics. Some say that if you can blow air through the fabric without too much resistance then you have a decent fabric for this application. You can use thicker fabrics, and they’re especially good for durability, but I’d just suggest not going for anything too thick unless it has thicker/textured threads (and thus appropriate spacing between them).
If you can take a good look at existing acoustical treatment somewhere, check the look and feel of the fabrics they use. If not, just use your better judgement. Be sure to get fabric that’s off a bolt at least 56″ wide (and preferably a little larger), so that you can wrap that around the 48″ length of your panel. Anything smaller and you’ll have to buy twice as much fabric!
(Commercial applications require panels that are up to fire code. Failing that, you may have problems with insurance. If you’re putting panels in a commercial location, do a little research on that before hand, and be sure you get appropriate fabric for that application.) Okay then, let’s get down to it!
Step 1: Prepare Your Materials
Use your miter or circular saw to cut the framing lumber to the right sizes (or have it cut where you purchased it). I’m going to assume you’re using the Roxul Safe’n’Sound, which is actually 47″ x 23″, so I’ll give cuts that suite that size. You’ll want the outside of the frame to be exactly 2’x4′. With the thickness of the frame at 3/4″, that’ll put the inside of the frame at 22.5″ x 46.5″. Don’t worry, the Roxul will squish quite nicely into the frame for a snug fit.
The edges of your frame will connect in a butt joint. Cut 16 pieces at exactly 24″, and another 16 pieces at 46.5″. When you account for the thickness of your saw blade, you won’t be able to get four short pieces out of your 8′ piece, so alternate. You’ll get two full panels worth out of every three 8′ pieces. Smell the pieces of lumber. Doesn’t freshly cut pine smell awesome!?!
Cut your fabric into 1 yard pieces. If you purchased exactly 8 yards, you may want to cut at 34″ instead of 1 yard to compensate for less than perfect cuts. 34″ will be more than enough. Your plywood should already be cut to 2’x4′ pieces before you leave your builder’s supplies outlet.
Recap
Take your framing lumber and cut 16 pieces at exactly 24″, and another 16 pieces at 46.5″.
Smell the freshly cut lumber (because it smells awesome).
Cut your fabric at 34″ (assuming it’s from a 56″ or larger bolt of fabric). 8 pieces.
Have your plywood cut at the builder’s supplies outlet into 2’x4′ pieces. 8 pieces.
Step 2: Build Your Frame
Line up the wood for your first frame. If you do not have a brad nailer, pre-drill a hole for 1 screw at each joint. Pre-drilling is crucial to keep everything aligned and prevent splitting. Apply the glue and screw the frame together. Keep in mind, the screw is only there to hold the frame together until the glue dries. The glue will form a much tighter bond than a screw could.
Apply a bead of glue all the way around the face of the frame and put a plywood backing on it. You may have to shimmy the frame a little if it’s a bit of a rhomboid. It probably won’t be perfectly rectangular until you adjust it. Now drive some nails through the ply into the frame. Don’t skimp on the nails.
Recap
Line the pieces for the frame up in preparation for assembly.
Pre-drill a hole for one screw at each corner (going through the 24″ piece into the end of the 46.5″ piece).
Apply glue to the ends and screw each corner together.
Put a bead of glue all the way around the part of the frame facing up.
Put the plywood backing onto the frame and use it’s shape to straighten the shape of the frame.
Nail the backing into place.
Step 3: Wrap The Frame In Fabric
Insert the core material into the frame. If you purchased spray adhesive, coat the center of the inside of the back panel with some adhesive first, and the edges of the core material if you desire. Put on some gloves before handling the core material. Roxul is a rockwool, which is essentially fiberglass. It’s not a health hazard, but it’s definitely an irritant. Wear long sleeves too, and wash you hands with cold water afterwards. Cold water keeps your pores closed while you remove any fibers that may be on your skin.
Once the Roxul is in the frame, set it aside and lay a piece of fabric down on your work surface. Place the frame face down onto the fabric, leaving even amounts of fabric on each side. The best way to wrap a panel is like how you wrap canvas for a painting. To ensure it’s tight and even, start from the center of each side and work your way to the corners, pulling tighter as you get closer to the corner. Staple the fabric down at the back. Don’t skimp on the staples. Every 3 inches or so should do the trick.
Recap
Put on gloves before handling rockwool core material.
Apply spray adhesive to the center of the inside of the back panel, and to the edges of the core material.
Put core material into frame and set aside.
Lay out a cut piece of fabric (34″ x 56″+).
Place the frame with core material face down in the center of the fabric.
Wrap the fabric around one of the long sides first. Start by stapling it into the plywood in the center of that side.
Stretch the fabric from the stapled center toward one of the corners on that side (so that it is being stretched lengthwise on that side) and staple the stretched fabric every few inches. Do the same again from the center to the other corner on that side of the panel.
Then do the opposite side, starting with the center, and this time making sure you pull the fabric tight across the width of the panel. As you stretch the fabric toward the corners, make sure you are stretching both length and width.
Do the same process with the short sides, taking care to fold the corners neatly.
Step 4: Choose Placement
For placement, there are numerous techniques and every room and application is different. For the best and simplest rule of thumb in a home theater or control room environment, you’ll get great results placing them at first reflection points from your sound source. There’s an easy way to determine these spots.
Sit in the seat you’ll normally listen from, facing as you usually would.
Have a friend place a mirror flat against the wall and slide it around until you can see one of your speakers from your seat without shifting yourself to see try to see it.
Mark that point with a piece of tape.
Do the same for each speaker and each wall and the ceiling.
Place your panels over as many or these spots as possible.
Step 5: Hang Your Panels
Mount your panels using the mounting hardware. Make sure you mount them safely. They’re not too heavy, but you certainly wouldn’t want one falling on you. If you are mounting to the ceiling, be sure to attach appropriate mounting hardware to the sturdier wood of the frame of the panel, instead of just into the plywood backing.
Instead of hanging the panels, another option for studio environments is to attach two panels together with hinges and use them as portable baffles for isolating amplifiers and drums.
Full Recap
If you haven’t watched the video tutorial yet, do that now! Okay, let’s do a full written recap:
Prepare You Materials
Take your framing lumber and cut 16 pieces at exactly 24″, and another 16 pieces at 46.5″.
Smell the freshly cut lumber (because it smells awesome).
Cut your fabric at 34″ (assuming it’s from a 56″ or larger bolt of fabric). 8 pieces.
Have your plywood cut at the builder’s supplies outlet into 2’x4′ pieces. 8 pieces.
Build Your Frame
Line the pieces for the frame up in preparation for assembly.
Pre-drill a hole for one screw at each corner (going through the 24″ piece into the end of the 46.5″ piece).
Apply glue to the ends and screw each corner together.
Put a bead of glue all the way around the part of the frame facing up.
Put the plywood backing onto the frame and use its shape to straighten the shape of the frame.
Nail the backing into place.
Wrap The Frame In Fabric
Put on gloves before handling rockwool core material.
Apply spray adhesive to the center of the inside of the back panel, and to the edges of the core material.
Put core material into frame and set aside.
Lay out a cut piece of fabric (34″ x 56″+).
Place the frame with core material face down in the center of the fabric.
Wrap the fabric around one of the long sides first. Start by stapling it into the plywood in the center of that side.
Stretch the fabric from the stapled center toward one of the corners on that side (so that it is being stretched lengthwise on that side) and staple the stretched fabric every few inches. Do the same again from the center to the other corner on that side of the panel.
Then do the opposite side, starting with the center, and this time making sure you pull the fabric tight across the width of the panel. As you stretch the fabric toward the corners, make sure you are stretching both length and width.
Do the same process with the short sides, taking care to fold the corners neatly.
Choose Placement
Sit in the seat you’ll normally listen from, facing as you usually would.
Have a friend place a mirror flat against the wall and slide it around until you can see one of your speakers from your seat without shifting yourself to see try to see it.
Mark that point with a piece of tape.
Do the same for each speaker and each wall and the ceiling.
Place your panels over as many or these spots as possible.
Hang Your Panels
Hang on the wall or ceiling, being sure to use appropriate hanging hardware for their weight.
If hanging on the ceiling, attach the hanging hardware through the plywood backing and into the actual framing lumber, instead of just the ply backing, which will be less stable on its own.
Instead of hanging the panels, another option for studio environments is to attach two panels together with hinges and use them as portable baffles for isolating amplifiers and drums.
Aaaaaaaaand you’re done!!
Now listen to the results! If you’ve never experienced something like this before, you’ll be surprised at the difference between the sound quality of your room before and after this acoustical treatment. Your favorite audio, whether music or movies, will now sound as it was intended to (i.e. frackin’ awesome!).
I hope you enjoyed this tutorial! Check out our Facebook and Google+ pages, and subscribe to our mailing list to see future Weekly Creations as soon as they’re posted. And keep creative!
(Update: Click here for the full diy sound panel tutorial, or visit InityAcoustics.com for professionally made panels)
I know, we’re actually at week 19 of 2012, and it’s been about a month since I’ve posted. My aim with WeeklyCreations.com has been to keep my posts to a weekly schedule, but I’ve been (happily) tied up with the new sound panels business, amongst a couple other projects with the studio. So although we’re at week 19 of 2012, I’ll jump back and get Week 15 done first and make my way back on track.
I’ve recently had a few people voice the assumption that I won’t be posting the sound panel construction tutorial, seen as I now have a business selling them. But indeed I will be posting it! I think we have a tendency to feel threatened by competition. And I think the two main concerns a person would have with this particular situation are:
What if my potential customers make my product themselves instead of buying it from me?
What if someone else starts manufacturing my product as well, causing my business to go under?
I’ll admit, these are thoughts that ran through my head. They’re thoughts that run through my head with every business endeavor I’ve partaken in. But in reality, they’re just not relevant. They’re fears born of a scarcity mindset and a lack of real understanding for what makes a business work.
Why I’m Not Concerned
Potential Customers Lost To DIY!?! Oh Noooo!!
I’m not worried about losing customers for numerous reasons. Firstly, a lot can be said for the time and money saved through mass production. Having made enough of these panels, not only do I know the ins and outs, but it’s also been worth my while to bust my ass these last couple months and invest the time and money into buying the right tools and making quality jigs that serve to speed up and perfect the process.
A jig is like a template, or sort of cookie cutter for a particular stage of the manufacturing process. For example, the simplest one I have is for cutting my lumber to the right lengths. I attached blocks of scrap wood to my table top at pre-measured distances from my saw blade, allowing me to just throw framing lumber under the saw and push it up against the block for a perfectly sized cut every time without ever having to measure ever again. I use similar time savers throughout the whole manufacturing process. Some simple, some complex. But all worth it – if making more than just a few of a particular product.
Anyone can do this, and I think you should think up ways to do it with whatever kind of work you do! In fact, I think a future Weekly Creations post will be for a website where people can share jigs and templates ideas for any and every type of work, and even for very specific jobs. I think it’ll be great to help fellow DIYers, managers and entrepreneurs involved with companies of all sizes to improve their manufacturing process or productivity, making for a more efficient, less competitive, and more harmonious world.
Anyway, as good as jigs are, in some cases this approach would be wasteful and just not feasible. If creating a product for just oneself, creating jigs can take far more time than just creating the product itself directly. I would never have created these jigs or bought the better tools for the first run of panels I made for personal use – or even the first several orders. The jigs and tools cost much, much more than the materials for a single standard order, and have taken way more time to think up, design, create and develop than a dozen orders. But the end result of having mass production tools and jigs means a sturdier, well made product that can be made fast enough to keep the product price at a point well worth the time a customer can save by not having to make the product him/herself.
These developments to the process to facilitate high volume means what would take an individual without the jigs and custom tools an hour to do, I can do in half the time or less, and less labor time means less labor cost. Since for most of us time = money, that means buying something from an effective mass producer means more value for less time/money than it would take to do it yourself – depending on what your time is worth to you.
That said, if you have some of the basic tools and more free time than money, and you want to save on the cost of labor, I totally think you should build yourself any products you desire! I certainly do exactly that. The DIY mentality is good for individuals and society alike. With the panels business I can earn money from serving people who haven’t the time or interest for taking on such a project. I don’t need to earn it from people who need the cash (or could make better use of it elsewhere) and whom want to develop their DIY muscle! 🙂
Competing Businesses?!? Aaaaagghhh!!
And I’m definitely not worried about competing businesses. One thing I’ve learned in business is that ideas aren’t worth money. Execution of ideas is what’s worth money. The ideas themselves are merely multipliers of the value of the execution. Derek Sivers (creator of CDBaby.com) wrote about this on his blog. This is Derek’s basic explanation.
AWFUL IDEA = -1
WEAK IDEA = 1
SO-SO IDEA = 5
GOOD IDEA = 10
GREAT IDEA = 15
BRILLIANT IDEA = 20
NO EXECUTION = $1
WEAK EXECUTION = $1000
SO-SO EXECUTION = $10,000
GOOD EXECUTION = $100,000
GREAT EXECUTION = $1,000,000
BRILLIANT EXECUTION = $10,000,000
So for this idea to be worth anything, it has to be combined with quality execution. The business connections I’ve made and relationships with customers I’ve built are more important than any particular idea or knowledge of how to build a product. Same goes for relevant experience, business training, planning, marketing, product development, manufacturing process development, budgeting, etc. These things are all far more important to the success of a business than just a good idea or product.
Ideas aren’t the hard part. They’re a dime a dozen. It’s execution of ideas – the hard work, smart work, and persistent work – that’s the hard part. Though actually, I’m starting to think it’s not that hard. It’s just something to get the hang of.
Bottom line is, just because you know how to make a pizza, doesn’t mean your local pizza place should feel threatened. They may even sell you prepared toppings for your home cooking if you ask nicely. 😉
So, in the next Weekly Creations post I will show you the basic process of making these panels for yourself.
(Update: Click here for the full diy sound panel tutorial, or visit InityAcoustics.com for professionally made panels)
For week 12 I took on a little DIY project building sound absorption acoustical panels for the studio. Now, just two weeks later, I have a budding business making these panels for others! And the best part is, I started by borrowing small (really small) amounts of cash and tools. Let me tell ya how it came together.
The Motivation
When it all started I was essentially broke. Glenn was coming in to record some acoustic stuff. He’s a great player, and I really wanted to make sure we got the best sound possible. I didn’t have the sound panels I’d want for this, so I had to solve this problem. I think the best business ideas come out of solving a problem you have, and then providing your solution as a product or service to others. But at the time I wasn’t thinking about business, I was thinking about making a great sounding recording. Plus, I knew the panels would be a great Weekly Creations post. Sticking to this site is definitely great for keeping me motivated to take on and complete projects I might otherwise procrastinate on.
I did a little research into these sound absorption panels. Over the years of focusing on music I’ve also worked a handful of different jobs to make ends meet. One place I worked at several times is a place called Hammerhill Sound Systems where we built sub-woofer cabinets for car stereos. With this cabinet making experience the wood working part of these panels would be like second-nature.
So I decided to make some. I’m still planning to write a tutorial post on making these panels, but this post is about making a business out of them, so the tutorial post will have to wait for now.
Low Budget
Anyway, after a rough year and a particularly slow month, I was broke. But I knew I could make the panels for about $20 a piece, and that Glenn’s studio booking would bring in a couple bucks. So I borrowed $40 to get the materials for two panels. Well, I didn’t realize that (of course) some of my materials would have to be bought in higher quantities. So I managed to scrap together about $20 in change, and took out the last $20 I had in the bank. The ATM fees put me into overdraft.
The framing lumber, sound insulation materials and adhesives took up my $80, and I still needed fabric. So I borrowed another $20 and a bus pass and headed down to the fabric store to get some burlap to wrap around the panels. Then I borrowed a jigsaw from a buddy who lives down the street and made my first few panels that night in the parking lot behind my place – finishing up in the dark.
To be honest, those first ones sort of looked like they were made in the dark with a handheld jigsaw. But I was quite pleased when I used them to record Glenn and I realized just how much of a difference they made. The money from Glenn’s booking went to pay back the borrowed cash.
Test The Market
Still in need of some cash, the following Monday night I decided to post an ad on Craigslist and Kijiji for the panels I had made, just to see if anyone would be interested. You never know unless you try, right? I made sure I had all my stats about the NRC (noise reduction coefficient) in order and I added a link to the clean sounding recording of Glenn. Other manufacturers charge a minimum of $80 for similar panels, so I priced mine well below them at $60 each or $200 for a set of 4 (despite only having 3 made). Then I went to bed.
The next day I got a call from a marketing professional in Toronto who recently moved into an exceptionally reverberant downtown office. After finding out that I had made the panels personally, he offered to connect me with his custom printed fabric links and potential add my panels to the line of custom printed fabric products he sells online! He asked me to bring in a sample the following evening. I thought to myself “maybe I should make a good one, in daylight, for this guy”.
So I looked up pricing on mitre saws, found one on sale for 70% off at Canadian Tire, borrowed another $80 and made a single, higher quality panel; reusing the fabric from one of the old panels. He loved the panel (except for the beige burlap fabric) and we discussed testing his printed fabrics for their acoustic properties. Being an audio engineer helps with that side of things. Testing changes in what frequencies are reflected and to what degree is easy enough in the studio.
Improved Design, And Busting My Ass
While waiting for the fabric samples, my tax return finally showed up! This was enough to clean up some bills, pay back the borrowed cash and have a couple hundred bucks left over. Couldn’t be better timing, because that same day I got an order for four panels. So I raced to build some more of higher quality, improving on the design and spending that cash on better fabrics and hardware.
I filled that order and used some new pics of improved panels in a new ad. Then more calls came in. And then even more. And I continued to test fabrics and fill orders. I recently filled an order for a film company to use in one of their video editing suites. I busted my ass to add better fabrics to my existing panels in time to show them when they came by to check out what I had the morning after they called. They loved the ones they picked up, and texted me before the weekend to let me know they’d be calling back next week to get more for their other editing suites!
End Result
So in a couple weeks of low-cost testing and improvements, free online ads, word of mouth, a couple favors, and busting my ass a bit, I’ve managed to help out a bunch of people and create a new income stream for myself! It’s still very small, but it’s already profitable and adding a little extra cash to my (formerly overdraft) bank account.
This is the first Weekly Creation that has turned into a viable income stream. The Weekly Creations site certainly isn’t about money-making creations in particular, but it’s definitely nice for one of the projects to turn into something that serve those ends. As I said before, I credit this to two things; a website that motivates me to create and not procrastinate, and the idea of using your skills to solve a simple problem for yourself and then offering to provide that solution for others. It’s easy to connect with and serve customers when you consider yourself one of them.
Who’d have thought that after years of focusing on making a living from making noise, I’d end up making some extra money from reducing noise too. 😀
Last Sunday I decided to put some time into fixing up my old acoustic. It’s the guitar that came with me everywhere throughout high school and the years following. I literally never left the house without it, and it really took a beating over the years because of it.
Years back my family and a bunch of people at a place called the Kilt Pub that I was playing at a couple nights a week all put to buy me a new guitar – a beautiful Washburn. I’ve been playing it predominantly since, but I’ve always wanted to get my old guitar back in good working order. It’s got a lot of sentimental value, and I always loved the tone.
After recording Glenn Leybourne and his rich sounding guitar last week, I felt inspired to get on with fixing up mine.
Bridge Caving In
The pressure of the strings pulling on the bridge had been causing a larger than normal dip in the face of the body between the bridge and sound hole. This started many many years ago, and got to the point of causing the a lot of fret buzz. Well, back then I didn’t do a very good job of fixing it. In fact, my ghetto fixing job consisted of cramming a couple blocks of wood inside the guitar as a wedge between the face (sound board) and the back.
This worked for many years, but eventually led to a slew of other problems. First, it started causing the back of the guitar to extrude. Then, because the pressure from the strings was being redirected, it caused the seem between the sound board and the sides to crack.
My early 2000’s ghetto fixing job for that problem was to duct tape it up! I suppose I just thought it didn’t matter at that point. 😀
Fixing It Properly
Well, I really should have just fixed it properly back then. It really didn’t take much time at all. So this time around, I put the time in.
Cleaning
My first course of action was to get rid of the old strings and start cleaning it up! Look at all this dirt!!
The fret board was easier to clean than I thought it would be, though still took a little time. The best way to clean it is a nice little trick – use steel wool! It has to be very fine steel wool (it should be 0000 fineness) to avoid damaging the wood. But it’s amazing how well the steel wool works!
I also wiped everything down with a sham-wow and some wood soap.
Of course, I had to leave the duct tape and stickers. They’re as much a part of the guitar these days as the strings are!
Fixing Internal Bracing
After removing the strings and cleaning things up, I pulled out the old blocks I had within the guitar and inspected the internal bracing. As I suspected, there were problems
The bracing includes a main “X” shape. It turns out this was only connected to the sound board by two of the four points. To fix it, I used standard carpenter’s glue. I used a Popsicle stick and hold the bracing out from the sound board, and then used a thin piece of cardboard out of the recycling to spread the glue between the bracing and the sound board.
I couldn’t reach the further point with a clamp, so I used the internal blocks again to hold the bracing ’til the glue dried. I clamped the bracing closer to the sound hole.
Miscellaneous Fixes
I couldn’t afford new machine heads, so I just took them apart, cleaned ’em up and tightened everything. They’ll suffice for now.
I also fixed a fret that had a dent in it since I was about 16 years old. I throw a large rock into a planter near the Coffee Time we all hung out by, forgetting that I had left my guitar in the planter for safe keeping. 😐
Anyway, it took a while to pry it out, but I eventually got the fret loose with some pliers. I straightened it the pliers and gently hammered it back into place.
Lowering The Bridge Nut
The next morning, after the glue had dried, I threw a new set of strings on it to check the action – which wasn’t very good at all. I had replaced the bridge nut years ago and raised it to compensate for the other problems. It seemed that wasn’t necessary anymore.
But before I filed anything down, I checked to see if I needed to adjust the truss rod. This can be quickly tested by pressing down the first and last fret and checking the space between the frets and the string around the area of the 12 fret. There should be a space, but it should be too small for even a credit card to fit.
It seemed my neck was perfect already, so I moved on to filing the bridge nut. I just used a little sand paper. I put the nut back in and strung it up again.
End Result
I’m so happy with the end result!! The bracing is holding strong – as good as new. The body feels strong again and doesn’t creak anymore! The action is decent. Not perfect, but far better than it’s been in years. The damaged fret works properly again, and the fret board is nearly as clean the day I bought it.
But best of all, it sounds just like I remember it sounding so many years ago! The tone and timbre brings back so many different memories and vibes from all those years of playing countless hours, all night, in myriad places, with so many great people. The reminiscing inspired me to play ’til my fingers were raw. 🙂
It feels great to have my old guitar back in such great condition. At first glance it still looks beat up because, well, in many ways it permanently is. I have no intention of ever fixing the cosmetic damages. They’re just marks of the years of service. They’re battle scars. Like the duct tape and stickers, they’ll remain until the guitar crumbles to dust and ceases to be.
But structurally, and tonally, she’s back in her prime! I can’t wait to use it on some recordings. I’ll be sure to share them with you when I do.
This week I took on a little DIY project for the studio. I’ve needed some sound absorption acoustical panels for a while now. They can be pretty pricey – anywhere between $60 and $200 per 2′ x 4′ panel – but the materials themselves aren’t nearly that expensive.
So, I made some myself… for under $20 a piece!
Sound absorption panels not only make a huge difference in a studio, but they’re also quite useful in any home theater or media room. We’re all generally used to acoustically untreated rooms, so we don’t even realize what a difference they can make. But when sound bounces off walls before reaching the listener (or microphone, in the case of the studio) it gets muddy. The short delay in the reflected sound causes a subtle echo effect that greatly reduces clarity and distinguishability.
Sound absorption acoustical panels effectively cut the reflections off hard surfaces in the room and leave you with just the clean, direct, unadulterated sound. This is why movie theaters have giant panels on every wall. In a home theater, It’s like combining the clarity of headphones with the power of surround sound speakers!
Glenn Leybourne
In the studio the panels serve to create crisp, clear recordings. I built the panels last night, and today we had a great acoustic player in the studio by the name of Glenn Leybourne. Anything short of the clarity of an environment treated with these panels would be an injustice to Glenn’s great sounding voice and guitar. Give a listen to this!
The panels are pretty simple structurally – made from sound absorption insulation within a wooden frame and wrapped in a sound-transparent fabric (that lets the sound through to be absorbed by the insulation, instead of reflected by the fabric). In my next post I’ll do a little tutorial on how they’re made.
In the meantime, enjoy Glenn’s music, and stay creative!
I saw this simple but joyful idea recently when a friend shared it with me on Facebook, and I just had to do up my own version for the studio!
Here’s the Bob Marley Cable Caddy. Simple, but ever so effective! I’m not sure who came up with it originally, but I hope you like my rendition of the idea.
Happy St. Patrick’s Day! Time to get back to my drink. 🙂
This week’s creation came at the request of a regular Inity Studios artist named Chris Tipsy who wanted a place to share his 2011 release The Game Of Life Mixtape. I’ve long thought that it would be great to have our own private, customizable place where we could give away music created by myself and other Inity artists for those who would otherwise seek to download a pirated copy elsewhere. With Chris’ suggestion I thought why not include our local, connected musical family and make a broader community out of it?
InityPirates.com is a site based on “permissive piracy”. It’s permissive because, well, the artists said it’s okay. But it’s piracy ’cause free, full, high quality mp3s of entire albums that are for sale elsewhere is as good as robbery! Of course, you can always make a donation to the artist(s) if you choose to.
The site will have Inity Studios artist, as well as our friends, including artists recorded by Diverse and others. It is newly built, so will have more artists and albums added soon. I haven’t even got any of my own tunes up there yet! But there are a few artists with great music up there already.
Delay and Perfect, or Warts and All?
Although the site does just fine it’s main purpose of making mp3s available for playing or downloading, there’s still many problems with the site at the moment. For starters, the social sharing doesn’t seem to function as it should. Also, getting the PayPal donation button to work properly has proven equally difficult, so I had to leave it out for the time being. There’s some fundamental issues with the way the artist/album pages are generated that I haven’t been able to resolve yet.
But, as much as the perfectionist in me wants to fix all that before launching, Weekly Creations is all about getting something finished and posted. It’s Saturday night, at the end of week 10 of the year, and there’s no delaying tonight’s post. I’m proud of myself for keeping to schedule this far! The perfectionist in me cringes each weekend. But I’m glad to be posting. 🙂
Two weeks ago I posted about Inity TV for week 5’s creation. This past week I’ve updated the site with a new design and 15 new channels, including some of my personal favorites like Discovery, Comedy, A&E, Spike and TSN and bringing the total channel count to 52!
New Design
Earlier this week I launched the new design. I personally have a widescreen monitor, but after hearing from others who don’t and trying out InityTV.com on my laptop, I found that the channel selector on the side didn’t work well for most users because it always had to be manually opened and closed. I resolved this issue by having the channel menu slide up from a bar along the bottom, and then slide out of the way again when you click on the next channel you’d like to view.
I also added some nicer looking graphic design. The old look was bland – just something to get by. I like the feel of the new look. Here’s a side-by-side comparison:
Eew, gross!
Mmmmm, sexy!
15 New Channels – 52 Total
Wooohooo! New channels are always good! I wanted to put these ones in from the beginning but they don’t load within the Inity frame, so I had to devise some solutions. The only option for the time being is to have them come up as a pop-up video player window. I was hoping to avoid that, but it’s the only choice for now.
The new channels are amongst the best on the site! Here’s a list of all the InityTV channels.
A second post for week 6! I’m on top I’m my game this week. 🙂
I wrote this tune at the first sign of summer weather last year, but never took the time to record it. I had the idea in mind with just a simple acoustic thing I put down on my iPhone, but left any work on it for “later”.
Then, earlier this week my neighbor who runs the restaurant downstairs came by with a case of Coronas that a party had requested with their booked but only drank a couple out of. So, this is what happens when you combine a discount case of Coronas and a warm week in February with a guy like me. Looks like summer came early!
Normally I’d give a tune at least a couple days so I can come back to it with fresh ears to finish it off. But this is just a first run demo, and the Weekly Creations vibe is all about wrappin’ it and putting it out there. So, tell me what you think!
 In the meantime, here is the most recent project I’ve had some fun with. I just finished this smart mirror today and put it up near my front door. It displays the time, date, weather, custom info from the web (currently configured to random quotes), as well as a bunch of other options.


")


